Main Page
"HowTo"
Guides
Troubleshooting
Guides
BIOS related information
CPU related information
Overclocking
Articles
Downloads
Forum
Links
|
|
Howto:
A7V Cooling
|
|
I think anything over 60°C at full load can be considered
"too high", over 70°C can be considered "dangerously high"
| Tip: |
Don't use ASUS Probe Soft
cooling, CPUIdle, Waterfall or Rain with BIOS 1003 |
|


|
Using these programs will cause 1003's temperature
to rise to the one of 1004a/c (while not at 100% CPU load)
At http://www.podien.onlinehome.de/CPUCOOL.HTM
there is a program that at least doesn't rise 1003 temp. In my case
it didn't lower 1004s temp either, but there are reports that it (or
to be more precise, ctspd, which includes a .vxd from this program)
does. See here
or here
for details.
Further info : "Temperature Issue"
 ASUS Probe
Soft Cooling, Waterfall and Rain were tested by other persons. ASUS Probe
Soft Cooling, Waterfall and Rain were tested by other persons.
|
| Tip: |
Use BIOS 1003 |
|
|
1004 and aboveare running hotter than 1003 (if CPUis not
at full load, verified with Duron).
Further info : "Temperature
Issue"
But: 1003's behaviour is less stable. See this
article.
|
| Tip: |
Set PCI Master Read Caching to "Enabled" (important
with 1003 BIOS) |
|
|
At least with a Duron, this gives you much lower temperature
while idle. Full load temp is not influenced much by Bios
version.
But: this reduces stability. See this
article.
|
| Tip: |
... select a CPU Cooler ? |
|
|
Make sure that it's a Heatsink / Fan combo DESIGNED for Socket A -
No Gold Orb, fake copper orb, Socket 370 cooler etc. These are known
to easily DAMAGE your Duron or TBird by cracking parts of the edges
or corners of the CPU core (die). Avoid generic/cheap Socket A Coolers,
too.
|
|
|
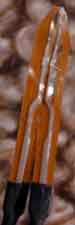
This is how my Duron 700 looks like - after (carefully!) attaching and
removing a cheap Socket A heatsink. There's a lot of silicon crumbled
off at the edges. I really wonder why it's still working flawlessly :-) |
|
|
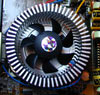
I once used the Thermaltake
Chrome Orb - called "Titan Majesty V" in Europe (and Asia?).
It keept my Duron 700 (ocerclocked to 900Mhz using Vcore of 1,79V) at
28°C when idle with ambient temperature of ~ 23°C.
There surely are better Coolers (some louder, some more expensive, others simply better) - Look into my CPU cooler review or refer to any site like tomshardware that tests coolers for further info
|
| Tip: |
... install the CPU Cooler |
|
|
Make sure that you either use Thermal Grease (recommended ) or the
thermal pad that may heve been originally applied onto your heatsink
(often inferior and can only be used once).
If you are using
the thermal pad which might have come with your cooler, make sure that ALL plastic coverings are removed. On
the Chrome Orb, for example, two strips of plastic are protecting the
Thermal Pad. While the first strip is easily removed, the second (light
blue) strip, just as big as the thermal
pad, is still attached. Many people did make that mistake, as it is done
easily. The temp was at about 60 to 70 °C idle.
For details on installing the Chrome Orb, read : Thermaltake
Support Page
|
| Tip: |
... apply thermal grease |
|
|
|
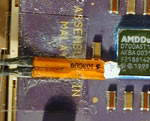
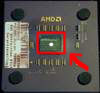
Inside the red box you see the CPU core (also called die). This is the only area
which must have contact to the heatsink - but this contact has to be very good.
When applying thermal grease, just place a drop as big as shown on
the core, the pressure from the heatsink will spread it evenly. More
doesn't mean better ! To the contrary, more grease will insulate the CPU core from the heatsink.
Don't use your fingers to smear the grease onto the CPU Your fingerprints and skin cells which rub off are quite "thick" and interfere with heat transfer.
Some people prefer to spread the grease instead of relying on the pressure. If you want to do this, use a razor or a clean credit card to do so. Make sure it is evenly spread and very thin.
|
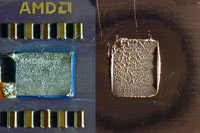
CPU / Heatsink |
The grease is meant to fill microscopic unevennesses in the material.
What we want is mainly direct heatsink metal to CPU die contact. Too much
grease will insulate !
If your CPU and Heatsink look like this when seperated again, you applied
a appropriate amount of grease. Actually,I did use a little too much
when doing these photos, as you can see by the small amount of grease
which was squished to the sides of the CPU core (Picture right : Heatsink).
|
| Tip: |
... install an external Thermal Sensor |
|
|
If you have an ASUS "P2T" sensor cable (I had one left from my P2B-F) , install it like this :
(you may build your own sensor cable, too. See this
article in the forum on how to do it. It will be thicker
than the P2T, so you can NOT mount it like described below!
)
|
|
|
First, cut as much of the plastic foil away
from the tip of the sensor as possible without damaging it.
This is to get the sensor really close to the core. |
|
|
Next, mount the CPU in the socket.
Apply a tiny drop of thermal grease to one side of the core.
Fix the sensor with a piece of thin adhesive tape. Make sure that the
tip of the sensor is touching the core from the side, but is NOT on
top of the core (as that would smash sensor and CPU core alike).
Connect the sensor cable to JTPWR. Voila, very fast (!) and quite accurate
readings - Compare it with the onboard sensor which is is very
slow, lagging behind the real temperature with a dealy of up to half
a minute.
See Troubleshooting: CPU heat
for more details on inaccurate onboard sensor readings. |
| Tip: |
...cool the Clock Chip |
|
|
It's running quite hot, even at the default 100 Mhz !
I don't
know myself if cooling it cures any problems, but others say it does.
It can't hurt, though. I used to burn my finger on it (meaning temp. was >55°C),
now it's cold to the touch.
|
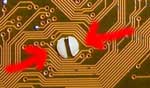
Clock Chip |
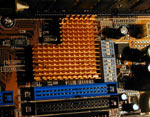
how I cool it |
I took an old 486
Heatsink and cut the upper left corner away (there's a quartz there which
is higher than the Clock Chip and thus interferes). I fixed it with
double sided sticky tape, if you have, use special heat conductive epoxy
glue. Using thermal grease to stick it to the chip and then using super
glue to glue the heatsink to the DIP swithes and either IDE Ports should work, too. |
| Tip: |
... cool the chipset |
|
|
ASUS does not apply thermal grease inbetween the chipset and its heatsink.
Remove the heatsink, apply a very small amount of thermal grease and
replace the heatsink.
I don't
think this is absolutely necessary, the chipset is relatively cool.
Can't hurt doing it anyway, though.
By the way : The motherboard temperature is not measured here, but at (actually "in") the chip with the ASUS printing on it.
|

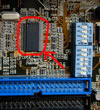
Chipset Heatsink |
|
To remove the heatsink, look at the solder ("bottom")
side of the A7V. The heatsink is fixed with two whitish pegs. Squeeze
their end parts like shown (with a pair of plyers for example). While
doing so, press the peg down and through it's hole. |
| Tip: |
set I/O Voltage to 3,3 V |
|
|
As Default, the I/O Voltage (for CPU I/O, RAM, Chipset etc.) is set
to 3,5V instead of the industry standard 3,3V.
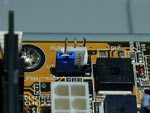
To fix this, set the VIO Jumper from 2-3 to 1-2 (Top of the board,
behind ATH Power Connector)
3.3V causes
no problems for me, but may cause stability problems with your specific mix of hardware. If you experience instabilities, set it back to 3.5V
I did
not verify that this lowers temperature. Others claim this, however.
|
Back to HowTo...
|
|